SwiftUI: Build a Progress Bar that Survives Page Transitions
Introduction
When building multi-step flows in SwiftUI, keeping a progress indicator visible during page transitions can be tricky. The naive approach of placing it inside the page’s content will cause it to animate in and out with each transition, which is not ideal for user experience.
In this screen flow implementation, we present a ProgressView to the user to track their progress
through a series of page transitions. Let’s have a look at the implementation:
struct ContentView: View {
    @State
    private var path = NavigationPath()

    var body: some View {
        NavigationStack(path: $path) {
            page(0)
                .navigationDestination(for: Int.self) { value in
                    page(value)
                        .safeAreaInset(edge: .top) { progress }
                }
        }
    }

    func page(_ number: Int) -> some View {
        VStack {
            Text("Page \(number)")

            NavigationLink(
                value: number + 1,
                label: {
                    Text("Go to \(number + 1)")
                }
            )
        }
        .frame(maxWidth: .infinity, maxHeight: .infinity, alignment: .center)
    }

    private var progress: some View {
        ProgressView(value: Double(path.count), total: 8)
            .padding()
    }
}
The problem here is, the view is part of the screen content and therefore animates in and out of the screen with the page transition.
In this post, I’ll walk you through, how I solved this problem, and share the considerations, that made me settle on a solution.
One step at a time
First, I’d like to think about some of the requirements we have on such a view. Let’s write them down:
- Visibility: The progress bar should remain visible through a page transition
- Positioning: It should position itself relative to (just below) the native navigation bar
- Scroll behavior: The bar should respond to user scroll gestures, by fading out and moving with the scroll content
These requirements ensure a native look and feel. While they are not necessarily all mandatory for every use case, they are a good starting point and provide the basis for the solutions I’ll present in the next sections.
We could consider to use a custom view container and animate the page transitions manually. And this
might even be a better solution for use-cases such as a simple onboarding flow. But, for this
case-study please consider a use case with more complex navigation logic. And/or a stronger emphasis
on accessibility and native navigation gestures. All reasons to go with the native NavigationStack
and navigation transitions.
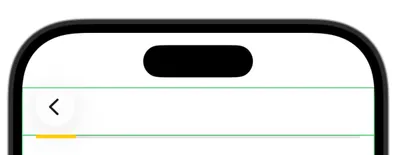
Visibility
To fix the visibility problem we can move the safeAreaInset modifier. This way the ProgressView
is not a child of the NavigationStack and appears visually persistent across page transitions.
        NavigationStack(path: $path) {
            page(0)
                .navigationDestination(for: Int.self) { value in
                    page(value)
                    // Moved from here ...
                    // .safeAreaInset(edge: .top) { progress }
                }
        }
        // ... to here:
        .safeAreaInset(edge: .top) {
            if !path.isEmpty {
                progress
            }
        }
Positioning
To correctly position the view in a safeAreaInset of a parent view is tricky when we don’t know the
child view’s safe area. The exact position of the .ignoresSafeArea(edges: .top) and
.onGeometryChange(for:of:action:) modifiers matters a lot here. Let’s have a look.
First, we add a @State variable for the contents safe area height:
    @State
    var contentSafeAreaTop: CGFloat?
Then directly on the page view, we read safeAreaInsets.top:
    func page(_ number: Int) -> some View {
        VStack {
            Text("Page \(number)")

            NavigationLink(
                value: number + 1,
                label: {
                    Text("Go to \(number + 1)")
                }
            )
        }
        .frame(maxWidth: .infinity, maxHeight: .infinity, alignment: .center)
        // Here, we read the safe area of the content.
        .onGeometryChange(
            for: CGFloat.self,
            of: { $0.safeAreaInsets.top },
            action: {
                contentSafeAreaTop = $0
            }
        )
    }
Also, we modify the .safeAreaInset(edge: .top) { progress } like that. Careful, the ordering 2
after 1 is important here:
    .safeAreaInset(edge: .top) {
        if !path.isEmpty, let contentSafeAreaTop {
            progressView
                // 1
                .padding(.top, contentSafeAreaTop)
                .padding(.horizontal)
                // 2
                .ignoresSafeArea(edges: .top)
        }
    }
This correctly positions the progressView directly below the navigation bar (or generally the safe
area) of the page, even though it is part of the safeAreaInset of the parent NavigationStack.
Scroll Behavior
Of course we might want to scroll our content, and doing nothing to the floating progress bar then will look weird. So, let’s add some opacity and move the progress bar to the top when we scroll out of the pages content.
First, again let’s add the @State variable:
    @State
    var scrollOffset: CGFloat = 0
Next, add the ScrollView and the onScrollGeometryChange(for:of:action:) modifier to calculate
the offset.
    func page(_ number: Int) -> some View {
        // Add ScrollView
        ScrollView {
            VStack {
                Text("Page \(number)")

                NavigationLink(
                    value: number + 1,
                    label: {
                        Text("Go to \(number + 1)")
                    }
                )
            }
            .frame(maxWidth: .infinity, maxHeight: .infinity)
            .padding()
            .border(.green)
        }
        // Add modifier
        .onScrollGeometryChange(
            for: CGFloat.self,
            // Calculate scroll offset
            of: { $0.contentInsets.top + $0.contentOffset.y },
            action: { _, new in
                scrollOffset = new
            }
        )
        .onGeometryChange(
            for: CGFloat.self,
            of: { $0.safeAreaInsets.top },
            action: {
                contentSafeAreaTop = $0
            }
        )
    }
Here, I use onScrollGeometryChange(for:of:action:) to calculate the offset, but if you need to
support iOS 17, the same effect is also possible to achieve using
.frame(in: .scrollView(axis: .vertical)).minY on a geometry proxy of a ScrollView’s child
view. That’s also why I used $0.contentInsets.top + $0.contentOffset.y here - it gives us the same
offset.
Of course we don’t forget to actually modify the progress view:
    .safeAreaInset(edge: .top) {
        if !path.isEmpty, let contentSafeAreaTop {
            progressView
                .padding(.top, contentSafeAreaTop)
                .padding(.horizontal)
                // Move and fade out the view when scrolling
                .offset(y: min(0, -scrollOffset))
                .opacity(1.0 - 0.1 * scrollOffset)
                // Beware of this ordering again
                .ignoresSafeArea(edges: .top)
        }
    }
And here is how it looks in action. Enjoy!